
Rendering
#Create Your First Form
Create TestForm.php
Create a test form in app/Forms/TestForm.php with the following content:
<?php

namespace App\Forms;

class TestForm extends \Laraform
{
  public function schema() {
    return [
      'hello_world' => [
        'type' => 'text',
        'label' => 'Hello',
        'default' => 'World'
      ]
    ];
  }

  public function buttons() {
    return [[
      'label' => 'Submit'
    ]];
  }
}
Pass The TestForm To View
Pass the form to the welcome view which comes as a default with Laravel. Update your routes/web.php with the following:
<?php

Route::get('/', function () {
  return view('welcome', [
    'form' => app('App\Forms\TestForm')
  ]);
});app() function to resolve Laraform's core dependencies when instantiating forms. This is because \Laraform's constructor relies on internal dependencies which are being injected and they need to be resolved.Render TestForm
Render the form in your resources/views/welcome.blade.php:
<!DOCTYPE html>
<html lang="{{ str_replace('_', '-', app()->getLocale()) }}">
  <head>
    <meta charset="utf-8">
    <meta name="viewport" content="width=device-width, initial-scale=1">
    <meta name="csrf-token" content="{{ csrf_token() }}">

    <title>Laravel</title>

    @vite(['resources/scss/app.scss', 'resources/css/app.css', 'resources/js/app.js'])
  </head>
  <body>
    <div id="app">
      {!! $form->render() !!}
    </div>
  </body>
</html>
If you check out the website's actual source code, you'll notice that all this
render()function does is that it renders a Vue component, passing thejsonschema as:formprop. Everything else will be taken care by the Vue library on the frontend.
Compile & Run
Now you should have everything set up, so just run:
npm run devOnce assets are compiled you can launch your site for example with:
php artisan serveYou should see a very simple form with one single input and a Submit button:
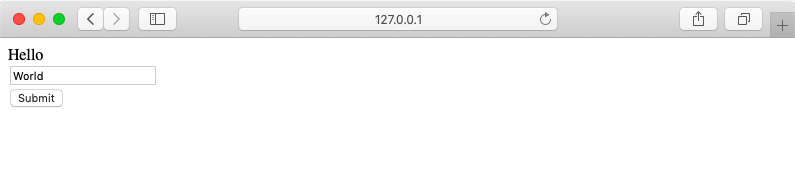
Our form might look ugly at this point but this is because we haven't included any styles on default theme on purpose, so you'll have an easier job customizing it to your needs. You can also go ahead and add eg. Bootstrap 4 to have a better looking layout.
#Attach Frontend Component (optional)
Your form is now fully functioning and ready to use, however if you want to go further and handle the frontend functions (like using frontend Events or Customizing layout) you need to attach a frontend component to your backend form. Let's see how can we do that.
Create TestForm.vue
First create TestForm.vue in your resources/js/components/forms directory:
<script>
  export default {
    mixins: [Laraform],
    created() {
      alert('The form is created')
    }
  }
</script>
This component is using the Laraform mixin and should have an alert message when the form is loaded, saying The form is created.
Laraform is a mixin available globally, so you do not need to import it separately.Add TestForm To Your app.js
Next we need to add this component to our app.js so that Vue will know about it:
require('./bootstrap');

import Vue from 'vue'
import Laraform from '@laraform/laraform'
import TestForm from './components/forms/TestForm.vue'

Vue.use(Laraform)

const app = new Vue({
  el: '#app',
  components: {
    TestForm
  }
})
Attach test-form To Your Backend Form
The last thing we need to do is tell our backend form that it should use a specific frontend component to render the form:
class TestForm extends \Laraform
{
  public $component = 'test-form';

  // ...
}
Compile & Run
Now compile your assets:
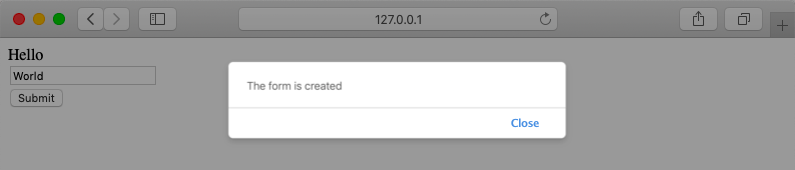
npm run devIf you refresh page the alert window should appear, which means we've successfully connected our frontend form to the backend:
#What's Next?
Once you have a basic form working on your website, you can start digging deeper and create actually working form. Please head to Submitting Data chapter.
If you'd like to jump in the middle and learn by doing check out our laraform/examples repository and see how different parts work together.